|
FireMonkey Style Explorer - Felix John COLIBRI. |
- abstract : create tFmxObjects from their class name, create their default style, display their child style hierarchy in a tTreeView, present each style element in an Object Inspector which can be used to change the property values.
- key words : tFmxObject, Fmx.tControl, tStyledControl - Children - streaming objects - Fmx.Types.FindStyleResource
- software used : Windows XP Home, Delphi XE2 Update 1
- hardware used : Pentium 2.800Mhz, 512 M memory, 140 G hard disc
- scope : Delphi XE2
- level : Delphi developer
- plan :
1 - FireMonkey control inheritance and style children
FireMonkey components have a double organization : - the Class Inheritance, the same as the standard VCL
- a style hierarchy which manages the display of the component
The style hierarchy is built using standard tFmxObjects as child controls of the component, as the following FireMonkey UML Class / Object Diagram shows :
Styles are NOT like skins or themes, some kind of cherry on the cake to only add some amazing look to your application. They are at the very heart of the FireMonkey component structure. They organize the vector graphic display,
enabling low level specification of each platform look and feel. FireMonkey component are not a thin encapsulation around Windows Controls, but full fledged components with their own drawing functionalities.
You can use the tStyleBook presentation du analyze, change or create the styles. However exploring the styles using code will give you more understanding of how styles work. As a aside, in our current version
(Update 1), on Xp Home, the Style Designer has the bad habit to vanish after one display, requiring a full reload of XE2. So our Style Explorer avoided this (temporary, early release) hassle.
2 - FireMonkey Style Explorer
tButton's style display Let's analyze the style of a simple FireMonkey tButton:
As the previous UML Class diagram demonstrates, starting from tFmxObject, each object is (potentially) a hierarchy of objects. Each tFmxObject can be a container. This is true
- for our standard user controls (you can place a tButton on a tPanel, on a tEdit, on a tButton itself)
- for the style hierarchy
So style hierarchies are not different. They simply use some "primitive style elements", like Fmx.tControls (tRectangle, tText), or even simple tFmxObjects (tAnimation, tEffect)
2.1 - Displaying the Style hierarchy Since the components are child components nested in tFmxObject.Children, is is quite easy to display them using a simple recursive procedure:
Procedure display_fxm_object(p_c_base_fmx_object: TFmxObject);
Procedure _display_fxm_object_recursive(p_level: Integer;
p_c_fmx_object: TFmxObject);
Var l_child_index: Integer;
l_display: String;
Begin
With p_c_fmx_object Do
Begin
If StyleName= ''
Then l_display:= ''
Else l_display:= StyleName+ ': ';
display(f_spaces(p_level* 2)+ l_display+ ClassName);
For l_child_index := 0 To ChildrenCount- 1 Do
_display_fxm_object_recursive(p_level+ 1, Children[l_child_index]);
End;
End; // _display_fxm_object_recursive
Begin // display_fxm_object
_display_fxm_object_recursive(0, p_c_base_fmx_object);
End; // display_fxm_object
| and here is the result applied to tButton1:
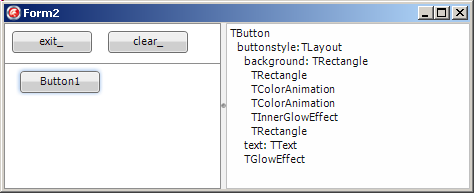
Note that - some of the style children have a StyleName. This name can be assigned to
some other tFmxStyledObject.StyleName to reuse this style. The name of the style child object is then the class name (without the starting "t" with "style" appended. "Button2" has a Button2Style style child
- some other children are assume to be not worthy enough to have as much of a StyleName, and the Style Designer only displays their (style element) type
2.2 - Streaming an tFmxObject
To display the stream of an object, we simply call tFmxObject.SaveToStream :
Function f_object_stream_string(p_c_fmx_object: tFmxObject): String;
Var l_c_string_stream: tStringStream;
Begin
l_c_string_stream:= tStringStream.Create;
p_c_fmx_object.SaveToStream(l_c_string_stream);
Result:= l_c_string_stream.DataString;
l_c_string_stream.Free;
End; // f_object_stream_string
|
with the following result : 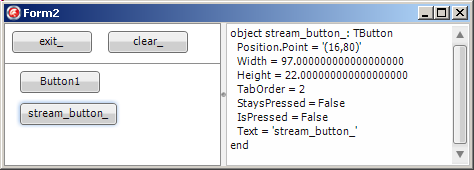
Displaying tFmxObject properties
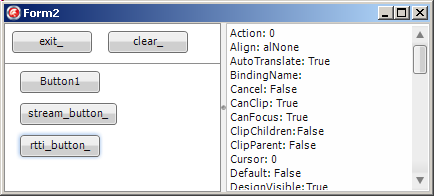
Now if we want to display the properties and their values, it is a simple matter of using RTTI. This has been explained at length in the
Simple FireMonkey Object Inspector article. Here is a function extracting the property names and values, using the "old" RTTI :
Function f_display_component_property_list(p_c_component: tComponent): String;
Var l_pt_property_list: PPropList;
l_property_count : Integer;
l_property_index : Integer;
l_property_name, l_property_value: String;
Begin
Result:= '';
GetMem(l_pt_property_list,SizeOf(Pointer) * GetTypeData(p_c_component.ClassInfo)^.PropCount);
Try
l_property_count := GetPropList(p_c_component.ClassInfo,tkProperties,
l_pt_property_list,true);
For l_property_index := 0 To l_property_count- 1 Do
Begin
l_property_name:= l_pt_property_list^[l_property_index].Name;
l_property_value:= GetPropValue(p_c_component, l_property_name, True);
If Result<> ''
Then Result:= Result+ k_new_line;
Result:= Result+ l_property_name+ ': '+ l_property_value;
End;
Finally
FreeMem(l_pt_property_list);
End;
End; // f_display_component_property_list
| with the following result :
2.3 - Creating a tFmxObject from its name
Each tObject has a ObjectClass Class reference which can be used to create the object from its name. Here is an example :
Function f_c_name_to_fmx_component(p_component_name: String;
p_c_owner: tFmxObject): tFmxObject;
Var l_c_object_class_ref: TFmxObjectClass;
Begin
Result:= Nil;
l_c_object_class_ref:= TFmxObjectClass(GetClass(p_component_name));
If l_c_object_class_ref<> Nil
Then Result:= l_c_object_class_ref.Create(p_c_owner);
End; // f_c_name_to_fmx_component
| This procedure uses an Owner, since tComponent requires one (or Nil) in its
Constructor Here is an example of calling the function with the 'tButton' name:
Procedure TForm1.create_button_Click(Sender: TObject);
Begin
With f_c_name_to_fmx_component('tButton', Self) As tButton Do
Begin
Parent:= Panel3;
Position.X:= 5;
Position.Y:= 5;
Text:= 'button_ok';
End; // create_button_Click
| with the following result : 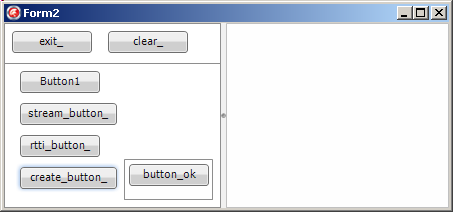
3 - The FireMonkey Style Explorer
3.1 - FireMonkey Style Explorer functionalities Using all those techniques, we can now build an explorer with the following functionalities - create an object from a list of object type names
- display the object and its children in a tTreeView
- when clicked, a tTreeViewItem displays
- the stream of the object
- the children names and types
- the property names and values
- and an Object Inspector where the properties can be modified
The overall structure is : 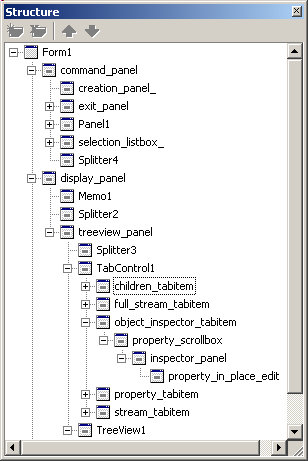
which looks like this : 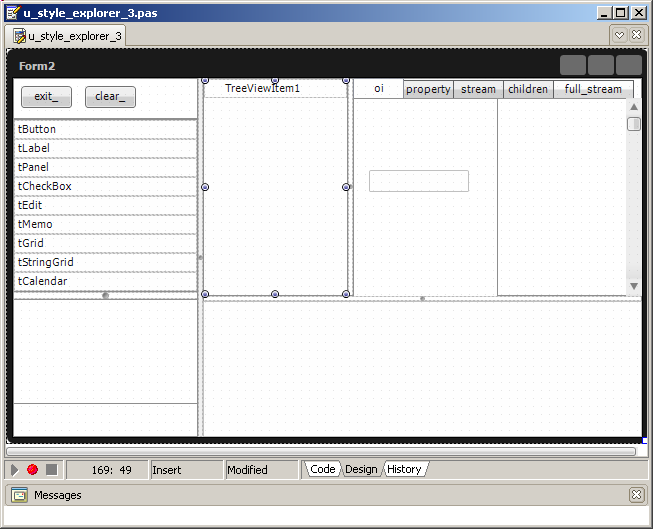
3.2 - The Style Explorer Class Name List:
A tListBox is filled with some class names, like tButton, tEdit etc. When the user clicks a name - the object is created from its type name, and displayed in the tPanel located below the listbox
- this object is used to fill the Treeview
Procedure TForm1.selection_listbox_Click(Sender: TObject);
Var l_component_name: String;
Begin
With selection_listbox_ Do
l_component_name:= Items[ItemIndex];
If g_c_created_fmx_object<> Nil
Then FreeAndNil(g_c_created_fmx_object);
g_c_created_fmx_object:= f_c_name_to_fmx_component(l_component_name, Form1);
If g_c_created_fmx_object<> Nil
Then Begin
// -- assign any visibe Text
If g_c_created_fmx_object Is tTextControl
Then tTextControl(g_c_created_fmx_object).Text:=
f_set_text_control_text(tTextControl(g_c_created_fmx_object));
If g_c_created_fmx_object Is tControl
Then
With tControl(g_c_created_fmx_object) Do
Begin
Position.X:= 10;
Position.Y:= 10;
End;
g_c_created_fmx_object.Parent:= creation_panel_;
// -- make sure the style children are created
If g_c_created_fmx_object Is tControl
Then
With tControl(g_c_created_fmx_object) Do
Begin
Repaint;
Application.ProcessMessages;
End;
add_to_treeview(g_c_created_fmx_object);
End;
End; // selection_listbox_Click
|
and the code to fill the tTreeView is:
Procedure add_to_treeview(p_c_base_fmx_object: TFmxObject);
Var l_element_index: Integer;
Procedure _add_to_treeview_recursive(p_level: Integer; p_c_fmx_object, p_c_parent: TFmxObject);
Var l_child_index: Integer;
l_display: String;
l_c_treeview_item: tTreeViewItem;
Begin
With p_c_fmx_object Do
Begin
If StyleName= ''
Then l_display:= ''
Else l_display:= StyleName+ ': ';
l_display:= l_display+ ClassName;
Inc(l_element_index);
l_c_treeview_item:= tTreeViewItem.Create(Form1.TreeView1);
l_c_treeview_item.Text:= l_display;
l_c_treeview_item.Parent:= p_c_parent;
// -- attach the object to the tTreeviewItem.Tag
l_c_treeview_item.Tag:= NativeInt(p_c_fmx_object);
For l_child_index := 0 To ChildrenCount- 1 Do
_add_to_treeview_recursive(p_level+ 1, Children[l_child_index], l_c_treeview_item);
End; // with p_c_fmx_object
End; // _add_to_treeview_recursive
Begin // add_to_treeview
Form1.TreeView1.Clear;
l_element_index:= 0;
_add_to_treeview_recursive(0, p_c_base_fmx_object, Form1.TreeView1);
Form1.TreeView1.ExpandAll;
End; // add_to_treeview
|
Here is a snapshot after clicking on tButton :
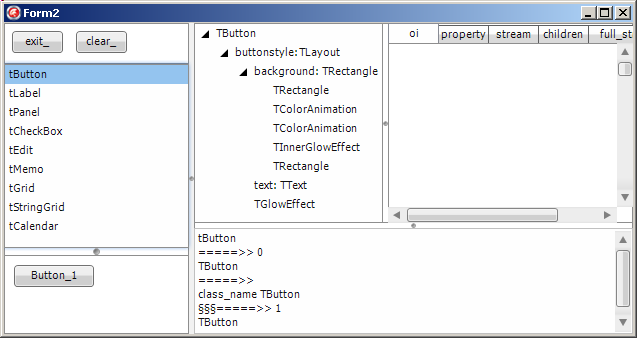
Just a couple of points: - the number added during the creation of the component is only for debugging
purposes
- our first trial of displaying the detail of the style children only displayed the created object and not it's style children.
The reason is that tMyClass.Create only creates the object with its own
properties, but does NOT create the style children We then added the children manually by - building the default style name from the class name
- calling the GLOBAL fmx.types.FindStyleResource to get the style
hierarchy with this style name
- adding this style hierarchy to the control
Here is the code :
Procedure add_style(p_c_styled_object: tStyledControl);
// -- explicitely add the style components
Var l_default_style_name: String;
l_c_fmx_style_object: tFmxObject;
Begin
display('add_style');
With p_c_styled_object Do
Begin
l_default_style_name:= ClassName+ 'style';
Delete(l_default_style_name, 1, 1);
l_c_fmx_style_object:= fmx.types.FindStyleResource(l_default_style_name);
If l_c_fmx_style_object<> Nil
Then p_c_styled_object.AddObject(l_c_fmx_style_object);
End; // with p_c_styled_object
End; // add_style
// -- call from \tListBoxClick
If with_style_.IsChecked
And (g_c_created_fmx_object Is tStyledControl)
Then add_style(tStyledControl(g_c_created_fmx_object));
|
- remembering that the IDE is able to add the style without any manual coding, we understood that this creation was performed when there is a need to display the control. tStyledControls use styles for display.
So
- we forced a repaint (and the FireMonkey library creates the default style hierarchy like we did)
- and made sure that this repaint was performed BEFORE analyzing the object for tTreeview insertion
- we tried to expand the style hierarchy. But tTreeView.ExpandAll only expands this level. We could easily add some simple recursive procedure. For the above snapshot we cheated by expanding the nodes manually
- our code could be improved in many ways, adding for example some BeginUpdate / EndUpdate here or there
- we used a tTabControl and not the tPageControl, which is no part of
FireMonkey. We assume that the tPageControl in the VCL is a simple Windows control encapsulation, and this explains why it is no longer available.
3.3 - Displaying a Style Element
When we click any tTreeView node, we display the information about the control
Procedure display_selected_fmx_object(p_c_selected_fmx_object: tFmxObject);
// -- a treeview item has been selected (or updated)
Var l_display: String;
Begin
With Form1 Do
Begin
l_display:= f_object_stream_string(p_c_selected_fmx_object);
stream_memo_.Lines.Text:= l_display;
children_memo_.Lines.Text:= f_display_fmx_object_children(p_c_selected_fmx_object);
property_memo_.Lines.Text:=
f_display_component_property_list(p_c_selected_fmx_object);
full_stream_memo_.Lines.Text:=
f_object_stream_string(g_c_created_fmx_object);
End; // with Form1
End; // display_selected_fmx_object
Procedure TForm1.TreeView1Click(Sender: TObject);
Var l_c_included_fmx_object: tFmxObject;
l_display: String;
Begin
l_c_included_fmx_object:= tFmxObject(Treeview1.Selected.Tag);
If l_c_included_fmx_object <> Nil
Then Begin
g_c_fmx_object_inspector.fill_fmx_object_properties(l_c_included_fmx_object);
display_selected_fmx_object(l_c_included_fmx_object);
End;
End; // TreeView1Click
|
Here is an example of changing Button_1.Align to alLeft (look at the bottom-left: "Button_1" is left-aligned in it's parent panel): 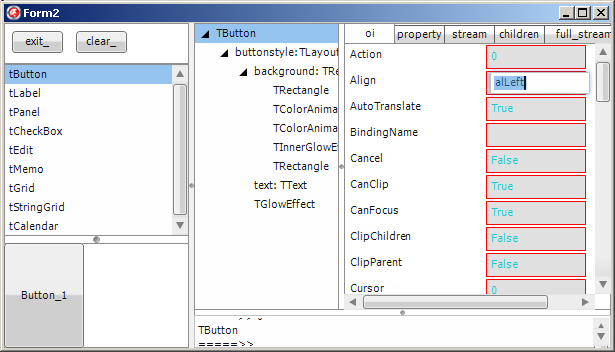 or when we rotate the different style rectangles and change the tText text: 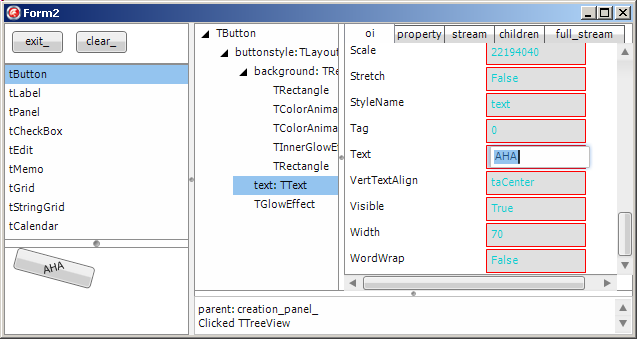
A couple of remarks - our simple Object Inspector only displays the string properties. So properties which are references to objects display the pointer value. This
is the case for Postion or Fill. We should rather display the innner object's properties. In other word, start building the property editors, or somehow reuse those. This is beyond the scope of this article
- the display of a component's property names and values comes straight out of our previous FireMonkey Object
Inspector article, which contains the implementation details.
4 - Changing All Colors Using the previous understanding, we can recursively visit each component of a
hierarchy and change some target property value, filtering the property according to name, type, value, owner component name or type etc.
Let's for instance change all the colors somehow modifying the tAlphaColor
value. The criterion is the property "tAlphaColor" type. The transformation is an arbitrary increase. Here is the procedure which visits all the components of the Form:
Procedure analyze_color(p_c_base_fmx_object: TFmxObject);
Var l_c_name_stack: tStringList;
l_displayed_level: Integer;
Procedure _display_fmx_object_recursive(p_level: Integer; p_c_fmx_object: TFmxObject);
Var l_object_display: String;
Procedure get_properties_using_rtti;
Var l_rtti_context: tRttiContext;
l_rtti_type: tRttiType;
l_c_rtti_property: tRttiProperty;
l_property_name, l_property_value: String;
l_color, l_new_color: tAlphaColor;
Begin
l_rtti_type:= l_rtti_context.GetType(p_c_fmx_object.ClassType);
For l_c_rtti_property In l_rtti_type.GetProperties Do
Begin
l_property_name:= l_c_rtti_property.Name;
l_property_value:= 'aha';
If l_c_rtti_property.PropertyType.TypeKind In
[tkInteger, tkChar
, tkFloat
, tkString
, tkWChar, tkLString, tkWString
, tkEnumeration
]
Then l_property_value:= l_c_rtti_property.GetValue(p_c_fmx_object).ToString
Else l_property_value:= '?';
If l_c_rtti_property.PropertyType.ToString= 'TAlphaColor'
Then Begin
With l_c_name_stack Do
While l_displayed_level< Count Do
Begin
display(Strings[l_displayed_level]);
Inc(l_displayed_level);
End;
l_color:= StrToInt(l_property_value);
// -- the color transformation
l_new_color:= l_color+ $4040;
l_c_rtti_property.SetValue(p_c_fmx_object, l_new_color);
display(f_spaces(p_level* 2)+ ' => '+ l_property_name
+ Format(' %4x =>', [l_color, l_new_color]));
End;
End;
End; // get_properties_using_rtti
Var l_child_index: Integer;
l_color_count_string: String;
Begin // _display_fmx_object_recursive
With p_c_fmx_object Do
Begin
If Name<> ''
Then l_object_display:= Name
Else l_object_display:= '';
If StyleName= ''
Then
Else Begin
If l_object_display<> ''
Then l_object_display:= l_object_display+ ' ';
l_object_display:= l_object_display+ '['+ StyleName+ ']: ';
End;
If l_object_display<> ''
Then l_object_display:= l_object_display+ ' ';
l_object_display:= f_spaces(p_level* 2)+ Format('(%2d) ', [p_level])+ l_object_display+ Classname;
l_c_name_stack.Add(l_object_display);
get_properties_using_rtti;
For l_child_index := 0 To ChildrenCount- 1 Do
_display_fmx_object_recursive(p_level+ 1, Children[l_child_index]);
End;
With l_c_name_stack Do
Begin
If Count>= 0
Then Delete(Count- 1);
If l_displayed_level> Count
Then l_displayed_level:= Count;
End;
End; // _display_fmx_object_recursive
Begin // analyze_color
l_c_name_stack:= tStringList.Create;
l_displayed_level:= 0;
_display_fmx_object_recursive(0, p_c_base_fmx_object);
l_c_name_stack.Free;
End; // analyze_color
Procedure TForm1.shift_colors_Click(Sender: TObject);
Begin
analyze_color(Self);
End; // shift_colors_
| and here is the result after a couple of color changes :
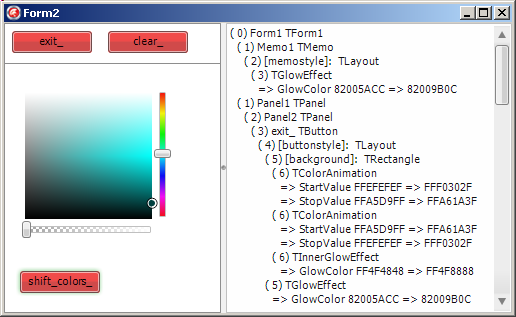
Please note that - the majority of the code is dedicated to the display, which could be removed for real use
Obviously the filtering could be tailored for changing more specific values, or generalized using procedural types or anonymous methods, for instance. If we know the exact type of the object and the property we want to alter, we
still can use the proven Components list technique. But this works for the ancestor properties. For the style hierarchy descendents, we have to cautiously check that the object and property exist, since the style might not be the
default style. Some later developer might have, statically or at run time changed this style hierarchy. This stresses the point that - styles are dynamic: they are created by loading the default style if no
custom style has been assigned to the StyleName property. The accurate algorithm is described in the Resource Search Sequence Wiki.
- style object even do not have a Name at each level of the style hierarchy. And not always a StyleName
5 - What's Next The Style Explorer project mainly enabled us to better understand the
FireMonkey organization. We could add many features to this project, like the ability to - save the modified styles in some .STYLE file, for later reuse
- build new styles by dragging and dropping some components on a tLayout, and
letting the user position the visible pieces
However there is no doubt the the IDE will include better Style Designer features than the one currently available (XE2 Update 1, Sept 2011). So the
best is perhaps to wait, and see if there is some benefit to spend more time in this area.
A couple of things still missing from the current release - the documentation of each control telling us
- for each tStyledControl, what its default style elements pieces are
- how to change some stock properties (the Color, the Text etc)
- an easy way to change some style values, without having to query
FindStyleResource, check for Nil etc. Something like xPath maybe ?
6 - Download the Sources Here are the source code files: The .ZIP file(s) contain: - the main program (.DPR, .DOF, .RES), the main form (.PAS, .DFM), and any other auxiliary form
- any .TXT for parameters, samples, test data
- all units (.PAS) for units
Those .ZIP - are self-contained: you will not need any other product (unless expressly mentioned).
- for Delphi 6 projects, can be used from any folder (the pathes are RELATIVE)
- will not modify your PC in any way beyond the path where you placed the .ZIP (no registry changes, no path creation etc).
To use the .ZIP:
- create or select any folder of your choice
- unzip the downloaded file
- using Delphi, compile and execute
To remove the .ZIP simply delete the folder.
The Pascal code uses the Alsacian notation, which prefixes identifier by program area: K_onstant, T_ype, G_lobal, L_ocal, P_arametre, F_unction, C_lass etc. This notation is presented in the Alsacian Notation paper.
The .ZIP file(s) contain:
- the main program (.DPROJ, .DPR, .RES), the main form (.PAS, .ASPX), and any other auxiliary form or files
- any .TXT for parameters, samples, test data
- all units (.PAS .ASPX and other) for units
Those .ZIP
- are self-contained: you will not need any other product (unless expressly mentioned).
- will not modify your PC in any way beyond the path where you placed the .ZIP
(no registry changes, no path outside from the container path creation etc).
To use the .ZIP: - create or select any folder of your choice.
- unzip the downloaded file
- using Delphi, compile and execute
To remove the .ZIP simply delete the folder. The Pascal code uses the Alsacian notation, which prefixes identifier by program area: K_onstant, T_ype, G_lobal, L_ocal, P_arametre,
F_unction, C_lass etc. This notation is presented in the Alsacian Notation paper.
As usual:
- please tell us at fcolibri@felix-colibri.com if you found some errors, mistakes, bugs, broken links or had some problem downloading the file. Resulting corrections will
be helpful for other readers
- we welcome any comment, criticism, enhancement, other sources or reference suggestion. Just send an e-mail to fcolibri@felix-colibri.com.
- or more simply, enter your (anonymous or with your e-mail if you want an answer) comments below and clic the "send" button
- and if you liked this article, talk about this site to your fellow developpers, add a link to your links page ou mention our articles in
your blog or newsgroup posts when relevant. That's the way we operate: the more traffic and Google references we get, the more articles we will write.
7 - References Some documentation
Here are our previous XE2 / FireMonkey articles :
- FireMonkey Architecture : the basic tComponent <- tFmxObject <- Fmx.tControl <- tStyledControl hierarchy.
Firemonkey UML Class diagram, and short feature description. More global that the UML class diagram in this article
- FireMonkey Styles changing styles for all or for
some components, the Style Designer, content of a .STYLE file, setting then StyleLookup property, predefined styles. Basic style handling
- FireMonkey Animations tutorial : selecting the Property to animate, the start and end
values, the interpolation law, the speed and repetition. (in French)
- Simple FireMonkey Object
Inspector : building a FireMonkey Object Inspector which presents the components of the Form and displays their property names an values and allows the user to modify them at runtime. The property / name list was
included in this paper's Style Explorer
And the articles less centered on styles : - Delphi XE2
LiveBindings Tutorial : how to setup the SourceComponent and the ControlComponent and expression, tBindingsList, the bindings Editor, using several sources with tBindingScope, building bindings by code,
LiveBindings and databases. Far more flexible than the Vcl db_xxx, but with the risks of late binding (in French)
- Delphi LiveBindings Spelunking : analysis of the architecture of the Delphi LiveBindings : how the
tBindingExpression compiles a String expression to build an environment referencing objects which can be evaluated to fill component properties. Dump of the pseudo code and UML Class Diagram of the LiveBinding architecture
And the dynamic creation of components from their class name is explained in : - Delphi Virtual Constructor
Felix COLIBRI - March 2007
details the class reference and Virtual Constructor technique for creating components
8 - The author
Felix John COLIBRI works at the Pascal Institute. Starting with Pascal in 1979, he then became involved with Object Oriented Programming, Delphi, Sql, Tcp/Ip, Html, UML. Currently, he is mainly
active in the area of custom software development (new projects, maintenance, audits, BDE migration, Delphi
Xe_n migrations, refactoring), Delphi Consulting and Delph
training. His web site features tutorials, technical papers about programming with full downloadable source code, and the description and calendar of forthcoming Delphi, FireBird, Tcp/IP, Web Services, OOP / UML, Design Patterns, Unit Testing training sessions.
|